Research
Overview
Overview
Introduction
What is a Research Notebook?
Jupyter notebooks were created with the intention to support interactive data science and scientific computing across various programming languages. QuantConnect carries on that philosophy by providing an environment for you to perform exploratory research and brainstorm new ideas for algorithms. A jupyter notebook installed in QuantConnect allows you to directly explore the massive amounts of data that are available in QuantConnect and analyze it with python or C# CLI commands. We call this exploratory notebook environment the Research environment.
Accessing the Research Environment
A research notebook is created for every new project started in QuantConnect. However, you can create new notebooks by clicking Add New Notebook. You can access the default research notebook through the project file bar on the upper left-hand corner. Accessing the research notebook will spawn a new server which hosts the jupyter notebook you can analyze data on.

Basic Features
Creating, editing, and running cells.
The notebook allows you to run code in a safe and disposable environment. It is composed of independent cells where code can be edited and executed.

The notebook also allows you to provide descriptions of code with supplementary cells written in MarkDown.
You can create a new cell by first selecting an existing cell and then using the Insert Cell Below button on the toolbar.
Each cell can be edited with either markdown or python code. You can choose which language to use in the drop-down list in the toolbar.
To run an individual cell, you must first select that cell and then click the Run button on the toolbar.
Some useful keyboard shortcuts
| Shortcut | Description |
|---|---|
| Shift + Enter | Runs the selected cell. |
| a | Insert a cell above the selected cell. |
| b | Insert a cell below the selected cell. |
| x | Cut the selected cell. |
| v | Paste the copied or cut cell. |
| z | Undo cell actions. |
You can use the h key to view a list of all the available keyboard shortcuts.
Sharing Project Classes
Reusing Code Between Backtesting and Research
It is possible to reuse classes written in backtesting in the research environment. You can do this by importing the classes which contain the methods you wish to use. This is a great way of reducing development time and writing more efficient code.
MyHelperMethods.py
def Add(a, b):
   return a+b
Research Notebook
from MyHelperMethods import Add

# reuse method from MyHelperMethods
Add(3, 4)
QuantBook
QuantBook is a wrapper on QCAlgorithm which allows you to access QCAlgorithm methods in the notebook environment. QuantBook gives you access to the vast amounts of data QuantConnect hosts. Similar to backtesting, you can access that data using history calls. You can also create indicators, consolidate data, and access charting features. However, keep in mind that event-driven features available in backtesting, like universe selection and OnData events, are not available in research.
from clr import AddReference
AddReference("System")
AddReference('System.Memory')
AddReference("QuantConnect.Common")
AddReference("QuantConnect.Research")
AddReference("QuantConnect.Indicators")
from System import *
from QuantConnect import *
from QuantConnect.Data.Market import TradeBar, QuoteBar
from QuantConnect.Research import *
from QuantConnect.Indicators import *
from datetime import datetime, timedelta
import matplotlib.pyplot as plt
import pandas as pd

# Create an instance
qb = QuantBook()
QuantBook Example
Using QuantBook to subscribe to SPY data and then making a history call for daily resolution SPY data.
spy = qb.AddEquity("SPY")
history = qb.History(qb.Securities.Keys, 360, Resolution.Daily)
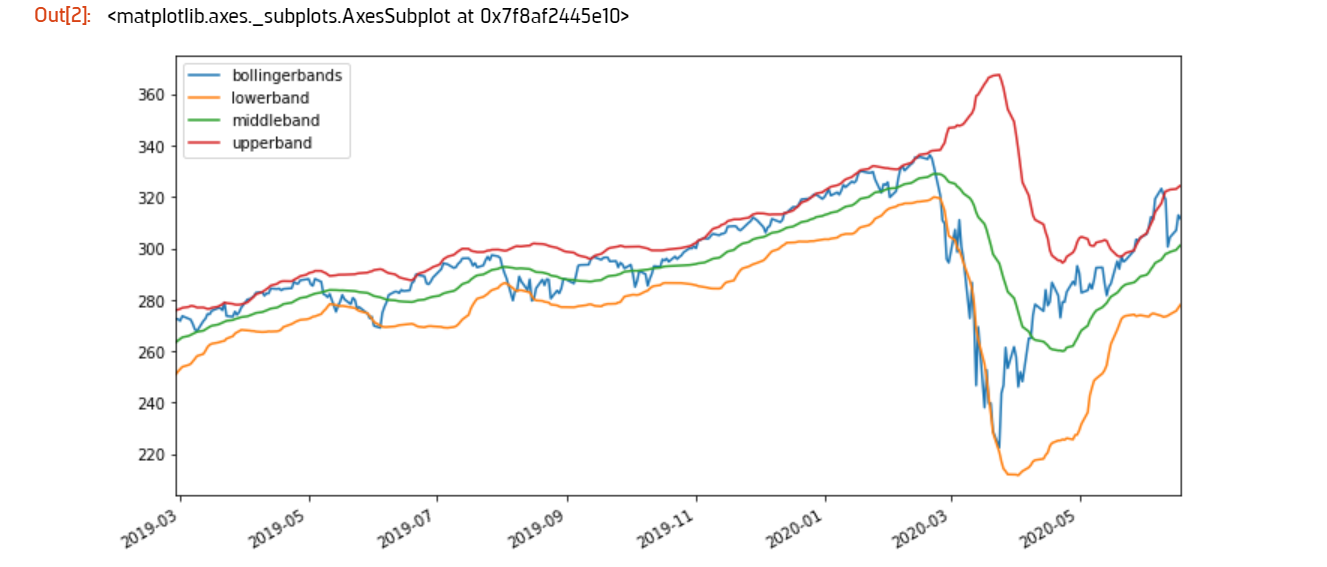
Using QuantBook to create a Bollinger Band indicator for SPY, dropping the standard deviation column and then plotting it.
bbdf = qb.Indicator(BollingerBands(30, 2), spy.Symbol, 360, Resolution.Daily)
bbdf.drop('standarddeviation', 1).plot()

 ORGANIZATIONS

